Rendering & Performance
Rendering is done through an intermediate cell buffer and a diff renderer:
- visuals render into a
CellBuffer - a diff renderer computes minimal terminal updates
- output is written in a single batched write per frame where possible
This makes rendering:
- deterministic (a frame is always a complete buffer),
- fast (diffing avoids rewriting unchanged areas),
- compatible with both fullscreen and inline/live hosting.
Why a cell buffer?
Terminals are stateful. If you write a line and then later move the cursor and overwrite a few characters, the terminal keeps the rest of the previous frame. That makes it hard to reason about rendering correctness, clipping, and focus effects.
XenoAtom.Terminal.UI instead treats each frame as a complete 2D buffer:
- every visual renders into a
CellBuffer - the buffer represents the entire desired terminal state for that frame
- a diff renderer compares the new buffer to the previous buffer and emits minimal ANSI updates
This is the same high-level approach used by many modern retained-mode UI systems: render to an intermediate representation, then efficiently update the output.
Render pipeline (high level)
In a typical frame, the app performs:
- Dynamic update (optional): controls may rebuild children based on state.
- Prepare: controls compute internal state needed for layout/render (e.g. scroll versions).
- Measure: controls compute
SizeHintsgivenLayoutConstraints. - Arrange: controls receive a final
Rectangleand position children. - Render: controls paint into the
CellBuffer. - Host render: the diff renderer writes ANSI output to the terminal.
Rendering must be side-effect free. Don’t mutate bindable state in RenderOverride.
Synchronized output (DEC private mode 2026)
Fullscreen and inline rendering use synchronized output to reduce tearing:
- “begin synchronized output” is emitted at the start of a frame
- “end synchronized output” is emitted at the end
Cursor handling
The framework uses the terminal cursor as the caret for text controls:
- only one cursor is visible at a time
- controls report desired cursor position during rendering
CellBuffer basics
CellBuffer is a 2D grid of cells. Each cell is a tuple of:
- a
Rune(glyph), - a
Style(foreground/background/text decorations), - optional metadata (e.g. hyperlink token).
Controls render by calling:
buffer.SetCell(x, y, rune, style)buffer.WriteText(x, y, span, style)
Coordinate space
CellBuffer coordinates are integer cell coordinates:
xis the column (0..Width-1)yis the row (0..Height-1)
Most controls use their Bounds (a Rectangle) as their render region:
var rect = Bounds;
for (var y = rect.Y; y < rect.Y + rect.Height; y++)
{
    for (var x = rect.X; x < rect.X + rect.Width; x++)
    {
        buffer.SetCell(x, y, new Rune(' '), backgroundStyle);
    }
}
Clipping
The buffer is clipped by the visual tree while rendering. For performance, many controls start with a quick clip check:
if (!buffer.ClipIntersects(rect))
{
    return;
}
Text, graphemes, and wide characters
Terminals render in cells, but Unicode characters do not map 1:1 to cells:
- some glyphs are wide (CJK, emoji) and occupy 2 cells
- some sequences are grapheme clusters (e.g. emoji with variation selectors) and should be treated as one visual unit
CellBuffer.WriteText handles this by iterating text elements and measuring their cell width with
TerminalTextUtility. If an element is wider than 1 cell, the buffer marks the subsequent cell(s) as continuations.
When writing custom text rendering, prefer buffer.WriteText(...) or measure using TerminalTextUtility so that your
control behaves correctly with wide/complex Unicode.
Style inheritance (overlay rendering)
Controls often render in layers:
- fill a background
- render children
- draw focus rings, selection highlights, markers, etc.
CellBuffer.SetCell merges the incoming style with the existing cell style using Style.MergeUnspecified(...).
That means:
- if you write a cell with
Style.None.WithForeground(...)it keeps the previous background - if you write a cell with
Style.None.WithBackground(...)it keeps the previous foreground (unless you override it)
This pattern is used heavily across the library (e.g. list rows fill their row background so the item visuals can inherit that style).
Diff renderer
After rendering a frame, the diff renderer compares the new CellBuffer to the previous frame and emits only the
necessary updates.
This is why many “live” UIs can run at 60 FPS without flicker: unchanged areas produce no output.
Some situations force a full repaint (for example after a resize, or when the host can’t safely preserve previous state).
Alpha-aware colors (RGB + RGBA)
Unlike many terminal UI libraries, XenoAtom.Terminal.UI supports alpha-aware colors via Color.RgbA(r,g,b,a).
This enables modern UI effects such as:
- subtle hover overlays,
- soft surfaces,
- dimmed backdrops behind modal dialogs,
- “lifted” panels using translucent highlights.
Internally, alpha colors are blended during rendering so that stacked overlays produce stable results. The final terminal output is still a concrete color per cell (terminals don’t have real alpha), but the blending makes layered UIs look consistent.
How alpha blending works
Alpha blending happens when a cell is written.
CellBuffer.SetCell:
- reads the existing cell style (the “under” layer)
- merges unspecified parts from the under style into the new style
- if the overlay contains
ColorKind.RgbA, it blends the RGBA color over the resolved destination color
Rules:
- only RGBA colors are blended (
ColorKind.RgbA) - palette colors (
Default,Basic16,Indexed256) are treated as opaque and never blended - blending is performed in linear color space using lookup tables for speed and stable output
- the result is stored as an opaque
ColorKind.Rgb(because terminals can’t represent alpha in SGR)
Blending is applied for:
- background RGBA: blended over the existing background color
- foreground RGBA: blended over the resolved background for that cell (foreground is “painted over” the background)
If the destination background is not RGB (e.g. a palette color), alpha is ignored and the RGBA is treated as an opaque RGB color. This keeps output deterministic across terminals with different color capabilities.
Alpha blending demo
The following screenshot is generated from the ControlsDemo and shows three translucent panels overlapping. The overlap
regions are computed by the CellBuffer blending algorithm:
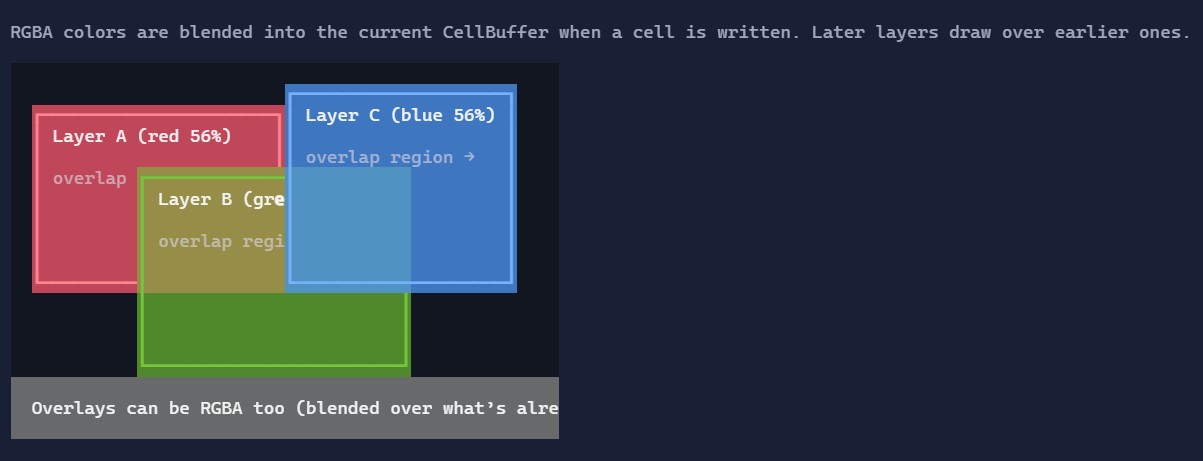
You can reproduce it by running the ControlsDemo and opening the Rendering → Alpha blending page.
Prefer alpha overlays for “soft” elevation, but avoid stacking many translucent layers over large areas if your UI is extremely dynamic; it increases per-cell work.
Avoiding allocations
The rendering path reuses internal buffers where possible to minimize per-frame allocations.
Capturing raster screenshots (CellBuffer → PNG/JPEG/WebP)
For pixel-accurate screenshots, use the companion package XenoAtom.Terminal.UI.Extensions.Screenshot.
It renders the CellBuffer through SkiaSharp and ships with an embedded CaskaydiaCoveNerdFont-Regular.ttf
default font so the demo screenshots include Nerd Font glyphs without requiring local font installation.
This is useful for:
- deterministic documentation screenshots,
- PNG/JPEG/WebP assets for websites and docs,
- verifying how terminal cells snap to real pixels with a specific font configuration.
All control screenshots in these docs are generated automatically from the ControlsDemo using the same rendering
pipeline as a real app. They are not hand-made images.
Install the package:
dotnet add package XenoAtom.Terminal.UI.Extensions.Screenshot
TerminalApp screenshot helpers
When you run a fullscreen app (or any TerminalApp), you can save the last rendered frame directly:
using XenoAtom.Terminal.UI.Extensions.Screenshot;

// After the app has rendered at least one frame:
app.SaveScreenshot("screenshot.png");
You can also capture a specific visual from the current frame buffer (cropped to its arranged bounds):
using XenoAtom.Terminal.UI.Extensions.Screenshot;

app.SaveScreenshot(myControl, "my-control.png", padding: new Thickness(1));
You can also copy the current app frame to the clipboard as a PNG payload:
using XenoAtom.Terminal.UI.Extensions.Screenshot;

app.TryCopyScreenshotToClipboard();
To make this easy to use in a real app, register the built-in screenshot command. By default it binds Ctrl+F12,
copies the current frame to the clipboard, and appears in the command bar and command palette:
using XenoAtom.Terminal.UI.Extensions.Screenshot;

root.RegisterClipboardScreenshotCommand();
If you already constructed the app manually, you can register the same command globally:
using XenoAtom.Terminal.UI.Extensions.Screenshot;

app.RegisterClipboardScreenshotCommand(new ScreenshotClipboardCommandOptions
{
    Gesture = new KeyGesture(TerminalKey.F10),
    Presentation = CommandPresentation.CommandPalette
});
TerminalAppSnapshotImageRenderer
For automation (docs/tests), TerminalAppSnapshotImageRenderer renders a visual tree to an in-memory terminal backend
and saves the resulting image:
using XenoAtom.Terminal.UI.Extensions.Screenshot;

TerminalAppSnapshotImageRenderer.Save(
    root,
    "snapshot.png",
    width: 120,
    height: 30,
    theme: Theme.ElderberryDarkSoft);
CellBufferImageExporter
At the lowest level, CellBufferImageExporter converts any CellBuffer to PNG, JPEG, or WebP:
using XenoAtom.Terminal.UI.Extensions.Screenshot;

CellBufferImageExporter.Export(buffer, "buffer.png", new CellBufferImageExportOptions
{
    AutoCrop = true,
    Padding = new Thickness(1),
    FillBackground = true,
    Font = new ScreenshotFontOptions
    {
        SizePx = 18,
        Path = "C:/fonts/MyTerminalFont.ttf"
    }
});
CellBufferImageExportOptions supports cropping, padding, background fill, output quality, and font/cell sizing.
SVG export
The dependency-free SVG path remains available in the core package through TerminalApp.CaptureSvg(...),
TerminalAppSnapshotRenderer.RenderSvg(...), and CellBufferSvgExporter.Export(...).
Writing fast custom controls
Implementing RenderOverride
Controls typically follow a predictable pattern:
- bail out if there is nothing to draw
- resolve styles based on the theme and state
- fill the background surface (so children can inherit predictable colors)
- render content/children
- draw chrome (borders, focus, markers)
Example:
protected override void RenderOverride(CellBuffer buffer)
{
    var rect = Bounds;
    if (rect.Width <= 0 || rect.Height <= 0 || !buffer.ClipIntersects(rect))
    {
        return;
    }

    var theme = GetTheme();
    var style = GetStyle<MyControlStyle>();

    var background = style.ResolveBackground(theme, HasFocus);
    for (var y = rect.Y; y < rect.Y + rect.Height; y++)
    {
        for (var x = rect.X; x < rect.X + rect.Width; x++)
        {
            buffer.SetCell(x, y, new Rune(' '), background);
        }
    }

    // Render content (children usually render after this control returns).
    buffer.WriteText(rect.X + 1, rect.Y, "Hello", style.ResolveText(theme));

    // Draw a simple border.
    var border = style.ResolveBorder(theme, HasFocus);
    buffer.SetCell(rect.X, rect.Y, new Rune('['), border);
    buffer.SetCell(rect.X + rect.Width - 1, rect.Y, new Rune(']'), border);
}
Guidelines:
- Prefer measuring text using
TerminalTextUtility(handles grapheme width). - Fill backgrounds explicitly when you want predictable inheritance (
Style.Nonecan inherit from what you wrote before). - Use
Span<T>/ReadOnlySpan<T>APIs for text and avoid allocating substrings in render loops.